

Create a REST API [Part 6]: User Login with JWT Authentication
In this tutorial, you will create a user login route for your API that takes an email and password, verifies they match what's in your database and returns a JSON Web Token if they do. This is part 6 of a series of tutorials on building a REST API in Node with ExpressJS, KnexJS, and PostgreSQL.

![Create a REST API [Part 6]: User Login with JWT Authentication](/static/81ade7b7964da5e51b46f26aca71b3f3/aeda5/create-a-rest-api-postgresql-with-knex-setup.webp)
More from this series
- Project Setup with Express
- PostgreSQL with KnexJS Setup
- User Registration and Validation
- Send Emails with Amazon SES
- Verify Users with Tokens
- User Login with JWT Authentication
- Forgot / Reset Password Routes
Introduction
No API is complete without user registration and login. We already have registration working so let's move on to the login route.
At some point you are going to need a way to send user specific data. For example, you might want to have user accounts with sensitive information that only they can access. You could make them log in each time they hit a route or you could maintain a sort of logged in state with the user. We'll use JSON Web Tokens to do this.
Step 1 - NPM JSON Web Token Package
There are a few ways to maintain a logged in state with a user. You could use cookies, sessions or JSON Web Tokens (JWTs). We like JWTs because of their simplicity to implement, mixed with some good security features.
To use them in NodeJS we use the jsonwebtoken package. Install it now so you can use it later on in the tutorial:
npm i jsonwebtokenand import it as "jwt" at the top of your users.js file:
// simple-api/api/routes/users.js
const jwt = require("jsonwebtoken");
To keep this tutorial short, we won't go in to too much detail here, but the jsonwebtoken package is an implementation of the JSON Web Token Standard in NodeJS. Using JWTs, we send a header, payload and signature to the user when they login that we can have them send back each time they access a protected route to verify who they are. This way the user logs in once and stays "logged in" for a set amount of time.
Step 2 - Login validation
When attempting to login a user should first pass some basic validation checks before we make a database request.
Create a new file called login.js in your validation folder like this:
const Validator = require("validator");
const ifEmpty = require("./checkForEmpty");

module.exports = function validateLoginInput(data) {
  let errors = {};

  data.email = !ifEmpty(data.email) ? data.email : "";
  data.password = !ifEmpty(data.password) ? data.password : "";

  if (!Validator.isEmail(data.email)) {
    errors.email = "Invalid email";
  }

  if (Validator.isEmpty(data.email)) {
    errors.email = "Email is required";
  }

  if (Validator.isEmpty(data.password)) {
    errors.password = "Password is required";
  }

  return {
    errors,
    isValid: ifEmpty(errors),
  };
};
This is a little simpler than our registration validation in that we just check that users aren't sending an empty email or password before moving on to the next part of the route.
Step 3 - Secret keys file
To use the jsonwebtoken package in the next step, you need a way to sign your tokens with a key unqiue to your API. This key can be used later to verify that the token was indeed issued by you (and not a bad guy) when it is sent back by a user to access a secure route.
In your utilities folder, create a new file called keys.js with the following (replace "insert_random_string" with your own random string):
module.exports = {
  secretOrKey: "insert_random_string",
};
We're using a simple string of random characters as our key here but there are more secure ways to generate a key that you can have a look at here.
Step 4 - Create the login route
In your users.js file, bring in your secret key and the validation function you just created:
// simple-api/api/routes/users.js

// Secret key
const key = require("../../utilities/keys");
// Login validation
const validateLoginInput = require("../../validation/login");
Now start creating the route at the bottom of users.js (Not below module.exports of course) with your validation function:
// Login route
router.post("/login", (req, res) => {
// Ensures that all entries by the user are valid
  const { errors, isValid } = validateLoginInput(req.body);

  if (!isValid) {
    return res.status(400).json(errors);
  } else {
And add a database call through KnexJS that selects id, email and password if the email in the database matches the email being used to login and only if they have verified their email:
database
    .select("id", "email", "password")
    .where("email", "=", req.body.email)
    .andWhere("emailverified", true)
    .from("users")
    .then(data => {
In the .then of the database call, we use a bcrypt function called compare to compare the password your user is attempting to log in with to the hashed password in your database:
bcrypt.compare(req.body.password, data[0].password).then(isMatch => {
    if (isMatch) {
If the passwords match, we use jsonwebtoken's sign function to create a signed token using or secret key and set it to expire after 1 hour (use a lower number for even better security):
  const payload = { id: data[0].id, email: data[0].email };
          jwt.sign(
            payload,
            key.secretOrKey,
            { expiresIn: 3600 },
            (err, token) => {
This payload contains a users id and email. You can send anything you want in the payload but it is not recommended to send the password.
Finally return the token with status 200 else return status 400 with a "Bad request" message
res.status(200).json("Bearer " + token)
})
} else {
res.status(400).json("Bad request")
}
})})
.catch(err => {
res.status(400).json("Bad request")
})
}
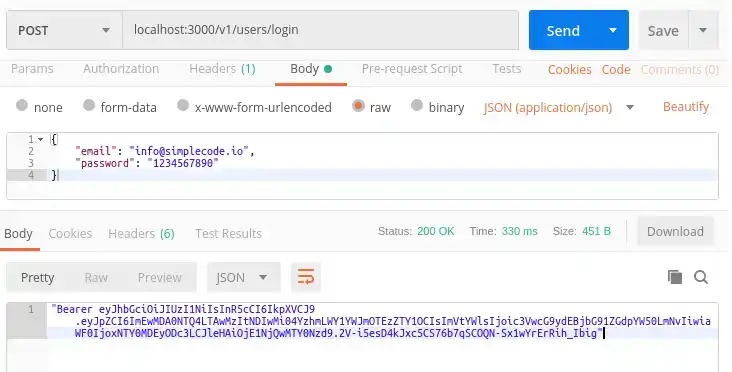
});Step 5 - See it in action
Make sure everything works by making a post request in postman to your new login route with an email and password that is verified in your database. You should see your token if everything is working:
Conclusion
That it for the login route. Now that you have a token, the next step is to have the user send it back and use it to access some protected route. But we'll save that for another tutorial. Move on to part 7 of this series to create routes to recover a lost password.
Tools
Crypto Alerts
© Cloud Giant 2024. All rights reserved