

Create a REST API [Part 3]: User Registration and Validation
In this tutorial, you will create a user registration route for your API, validate input passed to the route and add a user to your PostgreSQL database. This is part 3 of a series of tutorials on building a REST API in Node with ExpressJS, KnexJS, and PostgreSQL.

![Create a REST API [Part 3]: User Registration and Validation](/static/81ade7b7964da5e51b46f26aca71b3f3/aeda5/create-a-rest-api-postgresql-with-knex-setup.webp)
More from this series
- Project Setup with Express
- PostgreSQL with KnexJS Setup
- User Registration and Validation
- Send Emails with Amazon SES
- Verify Users with Tokens
- User Login with JWT Authentication
- Forgot / Reset Password Routes
Step 1 - Validating emails and passwords
When a user registers with our API, we will need to do some basic checks to make sure they are using a valid email address, their password is long enough and password1 and password2 match before entering them in the database. We will create our own validation as well as using the validator package from NPM. Install it now:
npm i validatorNow lets setup our validation files so we can bring them into our project later on.
Create a directory called validation in your root project directory and create a file called checkForEmpty.js. This will simply allow us to correctly check if a user enters no input.
// simple-api/validation/checkForEmpty.js
const ifEmpty = (field) => {
  try {
    let result = false;

    if (
      field === undefined ||
      field === null ||
      (typeof field === "string" && field.trim().length === 0) ||
      (typeof field === "object" && Object.keys(field).length === 0)
    )
      result = true;

    return result;
  } catch (err) {
    return err;
  }
};

module.exports = ifEmpty;
Create another file in the validation directory called register.js
// simple-api/validation/register.js
const Validator = require("validator");
const ifEmpty = require("./checkForEmpty");

module.exports = function checkRegistrationFields(data) {
  // An errors object is created
  let errors = {};

  // If data.email is not empty, data.email = data.email
  // else if empty, data.email = ""
  data.email = !ifEmpty(data.email) ? data.email : "";
  data.password1 = !ifEmpty(data.password1) ? data.password1 : "";
  data.password2 = !ifEmpty(data.password2) ? data.password2 : "";

  if (Validator.isEmpty(data.email)) {
    errors.email = "Email is required";
  }
  if (!Validator.isEmail(data.email)) {
    errors.email = "Email address is invalid";
  }
  if (Validator.isEmpty(data.password1)) {
    errors.password1 = "Password is required";
  }
  if (!Validator.isLength(data.password1, { min: 8, max: 120 })) {
    errors.password1 = "Passwords must be greater than 8 characters";
  }
  if (Validator.isEmpty(data.password2)) {
    errors.password2 = "Confirmation password is required";
  }
  if (!Validator.equals(data.password1, data.password2)) {
    errors.password2 = "Both password fields must match";
  }

  // Return the errors from the checkRegistrationFields function
  // and use the ifEmpty function to check if the errors object is empty
  return {
    errors,
    isValid: ifEmpty(errors),
  };
};
‘register.js’ uses the validator npm package and the ‘ifEmpty’ function we just created in ‘checkForEmpty.js’ to ensure that all input entered by the user while registering are valid.
Step 2 - Create the register route
In your users.js file, bring in bcrypt, crypto, your database.js file and the validation functions we just created.
// simple-api/api/routes/users.js
const express = require("express");
const router = express.Router();
const bcrypt = require("bcryptjs");
const crypto = require("crypto");
const database = require("../../database");

// Validation
const checkRegistrationFields = require("../../validation/register");
Remove the '/' route we created in part 1 of this series and create a new post route for '/register'. Using our validation functions we check that input from users is valid.
// Register route
router.post("/register", (req, res) => {

  // Ensures that all entries by the user are valid
  const { errors, isValid } = checkRegistrationFields(req.body);

  // If any of the entries made by the user are invalid, a status 400 is returned with the error
  if (!isValid) {
    return res.status(400).json(errors);
  }
Using crypto.randomBytes, we generate a random token with a size of 48 bytes that we will use in the next tutorial to verify users email addresses
let token;
crypto.randomBytes(48, (err, buf) => {
  if (err) throw err;
  token = buf
    .toString("base64")
    .replace(/\//g, "") // Because '/' and '+' aren't valid in URLs
    .replace(/\+/g, "-");
  return token;
});
Note: In production, you should use something more secure than ‘crypto.randomBytes’ to generate tokens.
Next we'll add our database function which inserts the users email, password, registration date, token, the date the token was created, whether the user is verified or not and if the token has been used before. With a salt factor of 12 we hash the users password with bcrypt so that we don't just store it as plain text in the database.
  bcrypt.genSalt(12, (err, salt) => {
    if (err) throw err;
    bcrypt.hash(req.body.password1, salt, (err, hash) => {
      if (err) throw err;
      database("users")
        .returning(["id", "email", "registered", "token"])
        .insert({
          email: req.body.email,
          password: hash,
          registered: Date.now(),
          token: token,
          createdtime: Date.now(),
          emailverified: "f",
          tokenusedbefore: "f"
        })
        .then(user => {
          // This is where the api returns json to the /register route
          // Return the id, email, registered on date and token here
          // Sending the user's token as a response here is insecure,
          // but it is useful to check if our code is working properly
          res.json(user[0]);
        })
        .catch(err => {
          errors.account = "Email already registered";
          res.status(400).json(errors);
        });
    });
  });
});
module.exports = router;
Note: The salt factor you use depends on your application requirements. While choosing a higher number might provide more security, it comes at a price of computing power. So ultimately, it’s up to you to decide what works for your application based on how much resources you have (computing power). You must also remember that, as the complexity of your password verification methods increase, your application is more vulnerable to Denial-Of-Service attacks.
Find the complete code for the users.js file here.
Step 3 - Testing the /register route
We are just about done, but let's make sure your new /register route is working. With your server running, open up postman and enter 'localhost:3000/v1/users/register' in the address bar. Select 'Body' -> 'raw' and 'JSON(application/json)' and enter in the following json:
{
  "email": "tim@example.com",
  "password1": "12345678",
  "password2": "12345678"
}
Press 'Send' and if everything is working properly, you should see:
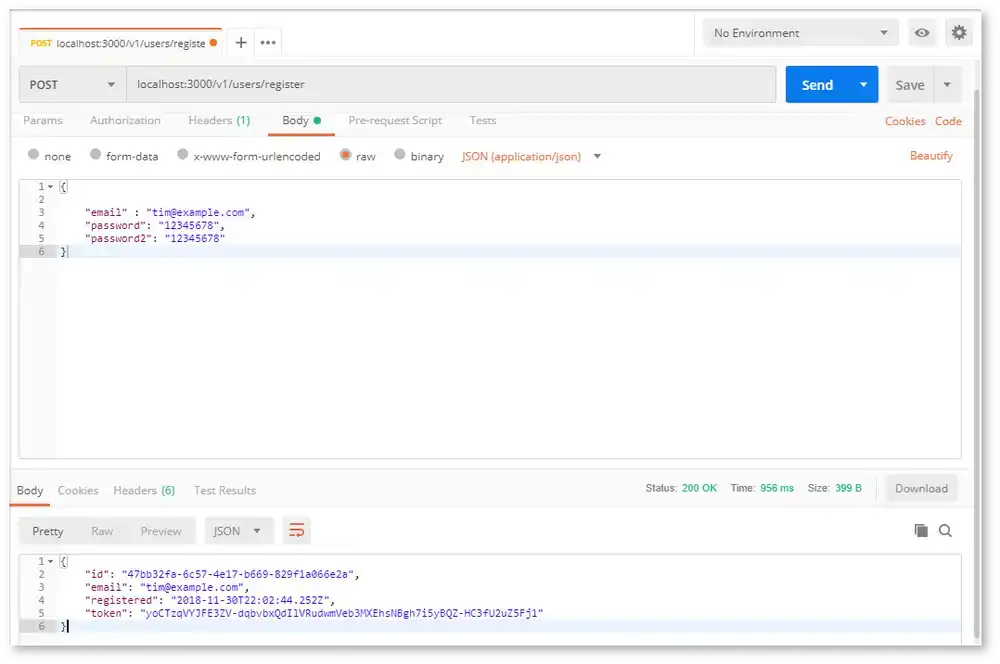
You'll have a new entry in your database with the email you entered, a hashed password and even a unique user id. Pretty cool!
Conclusion
This API is starting to take shape! When the /register endpoint is hit, the input is validated, the password is hashed and everything is stored in a PostgreSQL database. You can see how you can really start to build on to this. In the next tutorial in this series we will verify our user has registered with a valid email address by sending them a token using Amazon's simple email server (Amazon SES).
Use one of the links below to share this series on social media if it helped you out!
Tools
Crypto Alerts
© Cloud Giant 2024. All rights reserved